|
Hello, this is my
first submission to ARC: the Trumpeter 1/32 Flanker. I've always
wanted to build this big model and finish it in a spectacular paint job. I
even bought the Black Box cockpit set before I bought the kit itself,
but due to its sheer size (and the dire consequence of landing in my
wife's doghouse), I never followed through with the grand master plan until I
picked up the kit at the local hobby store for half of the MSRP (CDN$80!!!)
in August. When you see such a great kit on such a discount, you have to
buy first and ask questions later.
|
Click on
images below to see larger images
|
|

|
 |
|
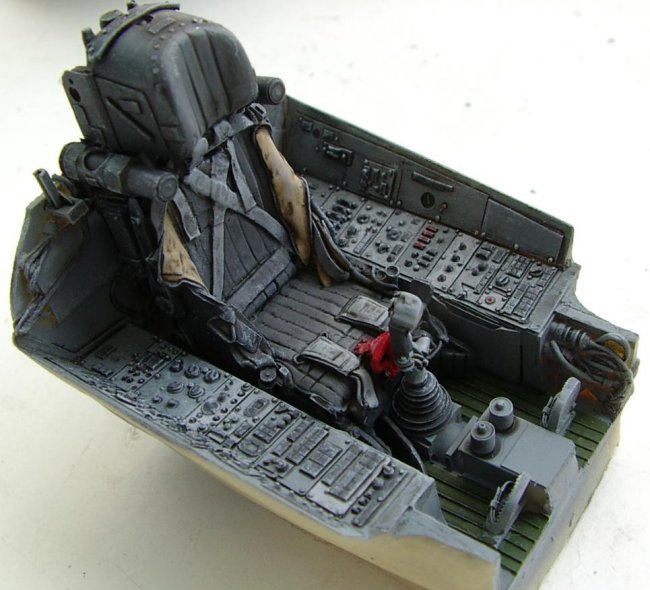
First thing to be constructed is
the cockpit. As with any Black Box products, the SU-27 resin cockpit set has
an excellent level of detail. As with any Black Box cockpit
sets, you'd curse the maker's mother for 50 times before you manage to fit the
thing inside the fuselage. The following are the problems that I
encountered with this BB set, just the usual minor fit issues,
nothing that'd make you want to jump off the balcony:
-
The tub floor needs to be
sanded paper-thin and part of the nose gear well bulkhead must
be removed in order to fit
-
The front coaming is
beautifully molded - if you were building a 1/20 scale SU-27. It's
molded too wide and no amount of trimming will get it to fit with either
the kit windscreen or Zacto model replacement (more on that later).
Use the kit part and scratch build the details
-
The rear panel behind the K-36
bang seat was warped in my copy. It'd fit nicely if you
negotiate with it in a civil manner (using files and razor saws), but you
might end up losing some details.
The rest of the kit went together
without too much headaches. It really is a straight-forward and easy to
build kit, especially considering it's a 1/32 scale kit with a lot of complex
lines. A lot of online reviews of this kit complain about the fiddly
nature of the photo-etch hinges for slats and flaps. Personally I
don't have any problems with them, in fact, I found them enjoyable to build
and worked well in most cases. What I didn't like was Trumpeter's
decision to make the landing gears actuate. I glued all of them tight.
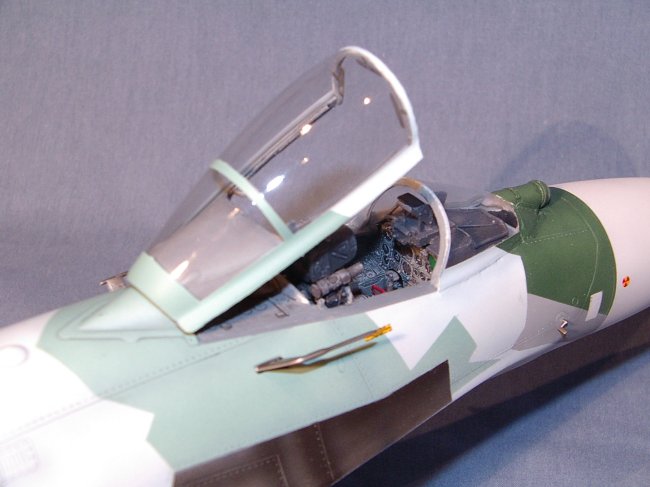
In addition to the BB cockpit set,
I also added Zactomodel's replacement canopy set. I ordered this set
when the model was primed and masked and ready for painting, thinking it'd be
a "drop-in" replacement. Well, it turned out installing this
vacuform canopy involved cutting part of the nose to install the
infra-red sensor. Half a tube of gap-filling super glue later, I had the
set installed and it was well worth the effort. The shape of the canopy
is sleek and beautiful, and the plastic's clarity is absolutely flawless.
Heck, I've never even seen glass that clear.
|
Click on
images below to see larger images
|
|
|
 |

|
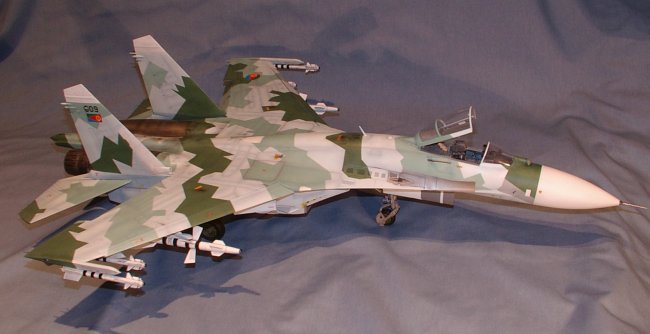
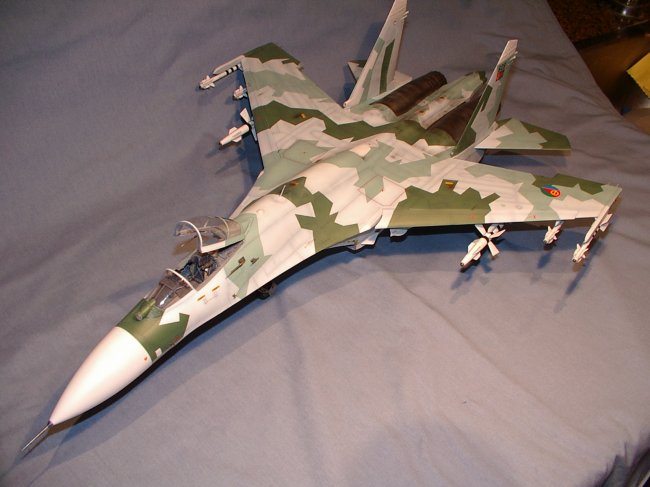
Painting this model was easily the
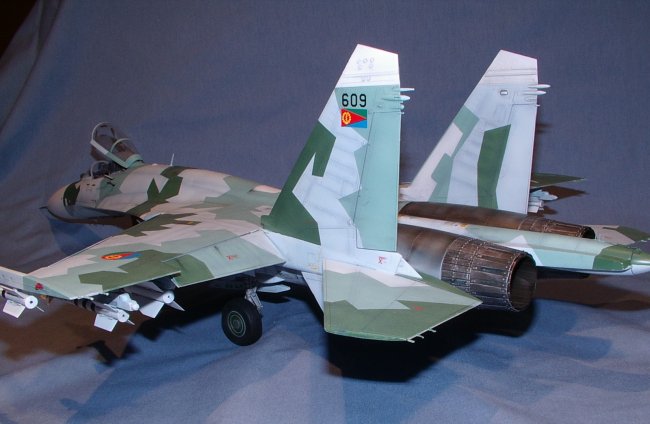
most time-consuming task. I chose to do my Flanker in the green splinter
camo of the Eritrean Air Force, beacuse as Paris Hilton would say,
"that's hot".
First the entire airframe
was sprayed with Mr. Surface 1200. This was followed by a good
rub-down with Tamiya 2000 grade sandpaper (which I affectionately refer to as
"Mrs. Surface"). The panel lines were sprayed with black, then
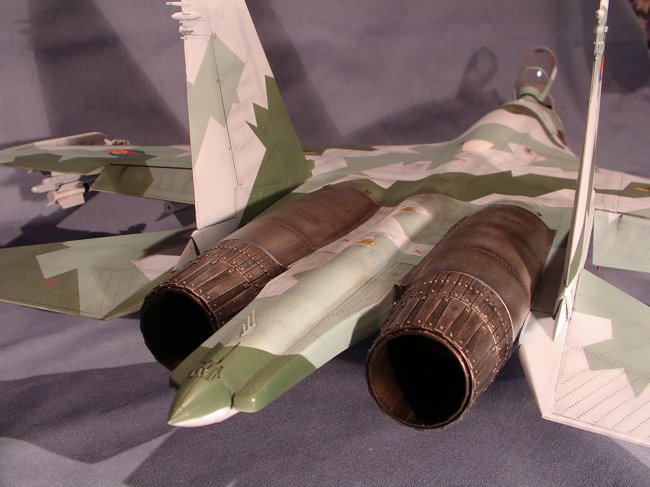
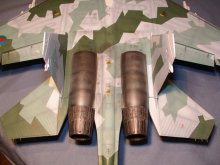
the engine area was painted with Alclad steel and jet exhaust. The next
step was spraying white over the entire airframe, leaving the black pre-shade
showing through.
Now comes the fun part: masking.
This complex paint scheme requires a lot of reference photos to aid the exact
implementation of all the lines and angles of the paint job. I'm an
advocate for building a model that is 100% accurate to the real thing -
as long as I don't have to leave my computer. A whopping total of 1
hour on Google later, I found only 3 photos of the Eritrean
Flankers, none of them show the top side view. Fortunately I happened to
have Hi-Decal's 1/48 International Flanker sheet (which has the ERAF Flankers) so
I used it as the reference in addition to my 1/32 Linden Hill
sheet instructions. I don't know how accurate the Hi-Decal instructions
are but it's the only thing I could go with.
If you're interested in doing a
splinter for this model, my recommendation to you is to buy a lot of Tamiya
masking tape. Think about the amount of tape required to wrap an
army of mummies, multiply that by 3, would be an somewhat accurate estimate.
My other recommendation is to have another concurrent project just so you
could break up the pace a bit: masking a splinter of this size is very
tedious.
The paints I used were mostly
acrylics: Gunze acrylics and Model Master Acryl. All 3 colors (pale
blue, medium green and dark green) were custom mixed by using reference photos
(yes, all the 3 of them). They were diluted to be translucent, then
sprayed on the whitened airframe. The translucent paint allow the white
and pre-shading to show through, creating a weathered and lightened scale
effect.
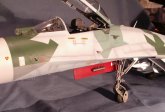
A coat of Future later, decals
were applied. The roundels, faux canopy and the number
"609" were from Linden Hill, the stencils were from the kit sheet.
I'm not convinced that all the stencils on Russion Flankers were applied on
ERAF Flankers, but I put them on anyways because there are no top view photos
to show otherwise. At least those red stencils add some visual interest
and contrast to a blue-green airframe.
A wash was applied to the decaled
model. This was followed by a flat coat and pastel chalk was
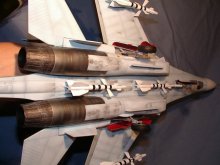
lightly brushed over panel lines for weathering. The landing gears
and missles were attached to the pylons. I don't even know if ERAF has
access to all those missiles, but by now the notion of 100% accurate is out of
the window so I just decided to just make this thing look cool. Hence I
tagged on 8 missiles.
The finished model is impressive
and I'm quite pleased with the paint job. It's so big that it won't fit
on my display shelf. I have to put it on my work bench.
When I need to work on another model, I'd move it to the kitchen counter,
where it'd receive the "death stare" from my wife.
Terry
|
Click on
images below to see larger images
|
|
|

|
 |
 |
|