The Aircraft
The
Kamov Ka-27 was developed to replace the Ka-25 in Soviet naval service, and is
now the Russian navy's standard ship based ASW helicopter.
The Kamov design bureau began work on a successor for its Ka-25 in 1967, when
Sergei Mikheyev became chief designer following Nikolai Kamov's death. The
Soviet navy required a replacement for its Ka-25s which could not operate
dunking sonar at night or in poor weather. The result was the Ka-27 (NATO name
'Helix'), an all new helicopter of similar overall dimensions to the Ka-25 and
featuring Kamov's signature counter rotating coaxial main rotors. The Ka-27 flew
for the first time in 1973.
The Ka-27's similar overall size to the Ka-25 means it requires only the same
amount of deck space to operate from as the older helicopter. However the
Ka-27’s more powerful Isotov turboshafts, give greater performance and allow
increased weights utilizing similar diameter rotors to the Ka-25.
The basic Ka-27PL anti submarine warfare helicopter features an under nose
mounted search radar, dipping sonar and disposable sonobuoys. The Ka-27PL
usually operates in 'hunter killer' teams, with one aircraft tracking the target
sub, the other dropping depth charges.
The
Ka-28 is a downgraded export version of the Ka-27PL, while the Ka27PS is a naval
SAR helicopter with some ASW equipment deleted, an external winch and fuselage
side mounted fuel tanks and the Ka-29 assault transport is another derivative.
The Ka-32 is the civil version of the Ka-27, and while none have been sold to
military operators, some Ka-32’s in Aeroflot markings have been observed
operating off Russian naval vessels.
Kamov
Ka-27PL “Helix” ASW Helicopter
Powerplant
Performance
-
Max
speed 250km/h (135kt)
-
Max
cruising speed 230km/h (124kt)
-
Max
initial rate of climb 2460ft/min
-
Service
ceiling 16,405ft
-
Hovering
ceiling out of ground effect 11,485ft
-
Ferry
range with auxiliary fuel 800km (432nm)
-
Radius
of operations tracking a submarine moving at up to 75km/h (40kt) at a depth
of 500m
-
(1640ft)
200km (108nm)
-
Endurance
4hr 30min.
Weight
-
Basic
empty 6100kg (13,338lb)
-
Operating
empty 6500kg (14,330lb)
-
Max
takeoff 12,600kg (27,778lb).
Dimensions
-
Rotor
diameter (each) 15.90m (52ft 2in)
-
Length
rotors folded 12.25m (40ft 2in)
-
Fuselage
length 11.30m (37ft 1 in)
-
Height
to top of rotor head 5.40m (11 7ft 9in)
-
Rotor
disc area each 198.5 sq m (2138sq ft).
Accommodation
Armament
Preamble
My
daughter Sarah was helping me catalogue my SAMI magazine collection and she
found a review of the Amodel Ka-25 “Hormone” helicopter. Well that was it; I
had to have one of these funky looking helicopters in my stash. A quick visit to
my local hobby shop uncovered the Zvezda Ka-27. I finally got the old Airfix
Ka-25 a little later down the road.
|
Click on
images below to see larger images
|
|
|

|
|
The
Kit
The
kit comes in a bigger than A4 size top opening box with a colourful painting of
a Ka-27 banking over a Russian Navy aircraft carrier.
So
what is in the box? There are three sprues within the box, all moulded in light
grey and a clear sprue for the canopy and windows. The canopy is rather thickly
moulded but has nicely defined framing.
Only
one decal option (in fact, there are only 8 decals on the sheet) is included
along with an instruction sheet with painting instructions. The instructions are
printed in both Russian and English, with easy to understand assembly
illustrations keyed out with basic colour instructions, which reference to
Modelmaster colours.
The
kit is a mix of lightly raised rivets and recessed panel lines. Dry fitting
indicated that the kit went together very well, with the most glaring
inaccuracies centred on the cockpit and minor shape issues.
Well I was not after a contest winner here at all and my knowledge of
Russian Naval aviation was basic to say the least, so I could safely ignore all
the shortcomings built into the kit.
The
alternative was to get the expensive KA-29 resin cockpit offering from Neomega,
but at twice cost of the kit, I felt a little scratch built detailing would
suffice and would be somewhat cheaper!
Construction
Assembly
started with the cockpit. Zvezda supply two seats, a bland centre console,
collective lever, joystick and an instrument panel. The seats just needed to
have some lead foil harnesses added. While the seats were drying I scratch built
throttle controls for the centre console and cemented that in the correct
position. The instrument panel was particularly simplistic with no dial or
display details. I used various shades of Vallejo acrylics to paint all the
cockpit components.
The
main cabin was devoid of any sort of detail whatsoever, which was fine as the
cabin door was moulded shut and nothing could be seen through the small cabin
windows. This issue sorted out, I added the rear firewall and cockpit tub to one
fuselage half and then used masking tape to hold both fuselage halves together,
thus ensuring each assembly was square and true while the cement cured. At this
time I also added a little nose weight to ensure the Helix sat on its front
legs.
The
remainder of assembly proceeded smoothly and rather quickly, with only small
amounts of filler in most areas required to smooth out ill fitting joints. Some
areas needed careful cleanup due to the need to protect raised surface detail.
All
parts needed cleanup with a sharp scalpel blade to remove mould parting lines
and the odd injector pin mark, nothing difficult and certainly something I am
used to, as I build a lot of older kits.
Once
this was done I cleaned up, polished and masked the canopy. The masked canopy
was offered up to the fuselage and cemented into place with clear parts cement,
reinforced with a careful application of liquid cement; this filled any gaps
between the fuselage and the canopy. A quick application of white glue, with
excess wiped away with a wet mk1 finger, smoothed out any remaining gaps. The
cockpit side windows were added at this stage as well and did not fit very well
at all, requiring some work to get a somewhat decent fit.
Once
masking was completed, I attached the main gear legs to the fuselage. Zvezda
supplies each assembly in three parts. Installation of each gear assembly was
quite easy and with a little manipulation, correct sit and checks to ensure the
assemblies were symmetrical was quickly achieved. I left off the smaller twin
nose gears to last so to prevent damage as they are quite delicate. The ease of
assembly of the outrigger type undercarriage of the Ka-27 was in stark contrast
to my earlier Matchbox Wessex build which caused a great deal of trouble.
The
addition of the landing lights and anti-collision beacons caused some issues due
to bad fit, but all was soon ready for painting.
Painting
and Decaling
Now
that construction was finished I could settle down to painting. I primed the
assembled fuselage with Tamiya primer. This did two things, providing a rock
solid base for subsequent acrylic paintwork and to reveal any hidden
construction flaws. There were several and I dealt with these quickly.
I
then used Aeromaster Dark Ghost Grey as per the instructions. I then added a
drop of white and faded out centres of selected panels. Mind you, when I had
completed the procedure, I could not see any difference in the paintwork. Oh
well, perhaps I was over cautious with lightening the paint!
The
completed airframe was put aside to cure prior to application of Johnsons
“Super Stride” with a wide flat brush kept especially for this purpose. Now
the KA-27 was ready for decaling.
I
had read several reviews of Zvezda kits stating that the decals were a hit and
miss affair, with shattering being the main culprit. Armed with this knowledge I
used Microscale decal film to overcoat the decals and carefully applied the
Russian star to one of the twin tails. The nice and thin decal performed like a
champion, allowing placement movement and reacting very well to Aeromaster Sol.
With a sigh of relief, I applied the last of the decals, left them to dry and
applied another couple of coats of future to seal them in.
I
would rate them an 8/10, only because of the slight registration issue of the
large yellow black outlined numbers and the concern over shattering or not.
I
then used a sludge wash mixed from Aeromaster UK Ocean Grey with a little
Aeromaster Tyre Black to darken the mix. This is an incredibly easy method of
imparting a wash to a model, with excess wash coming off easily using a damp
lint free cloth or cotton but. Hard to get at areas can be cleaned up using a
microbrush.
One
thing I do not like is too dark a panel wash as it makes a patchwork quilt out
of a model. An appropriately chosen and well applied wash draws the eyes to the
panel lines without overwhelming the "look" of the model.
I am a great believer in scale effect.
The
wash really changed the look of the overall finish of the model; breaking down
the monotone grey and giving that “in-service” look so common on Russian
equipment.
A
few days of drying time later, I airbrushed a coat of Pollyscale Flat Clear to
impart an even flat finish, so apparent on the reference pictures I have of the
Ka-27. The clear coat toned down and even removed a little of the wash here and
there, but nothing major and certainly nothing I was overly worried about.
Next
stage was some subtle dirtying and streaking with some grey chalk pastels. These
were applied sparingly and carefully around exhaust vents and areas that would
accrue more dirt, grease and grime
Finishing
Touches
Initial
dry fitting of the rotor assembly to the fuselage indicated a “sit” issue of
the rotor head in relation to the fuselage. Side views and pictures of the Ka-27
indicated the big contra rotating rotor head angled forward and did not thus sit
vertically. As built per the instructions, the rotor head sat more vertically
than it should.
The
solution was an addition of an internally installed angled brass tube acting as
a sleeve for the assembly. Once this was done, the rotor head sat square from
the front and had the correct forward angle from the side.
Overall
Zvezda
have provided the modeller with an interesting range of Soviet and eastern block
helicopters at a very affordable price (sub AU$20) and I will certainly be
looking at the Ka-52 sometime soon.
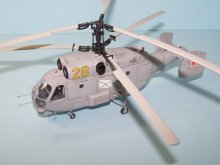
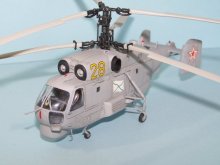
This
little Ka-27 Helix builds up very well indeed with some care and makes a great
addition to the display cabinet.
Good
fun and it looks great!
References
- The
Internet
- World
Aircraft Files
Michael
|


