|
|||||||||||||||||||||
|
|
|
|||||||||||||||||||||
|
|
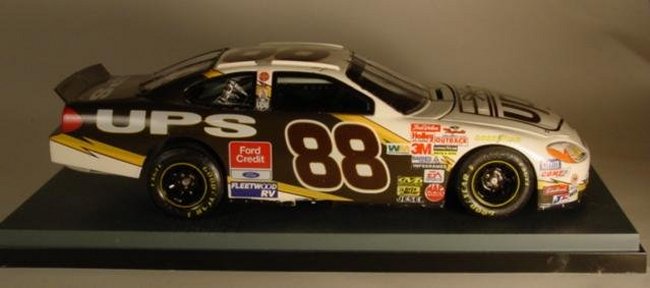
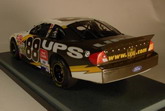
This is a kit I built for a guy at work. He was a manager at UPS for years and years until the office politics started getting to him. He decided a career change was in order and went back to school for a certificate in computer programming and now he's here. When this kit came out about a year ago I said to myself, Pete needs one of those. I picked one up as soon as I saw it. The kit is pretty detailed. Much more so than the old MPC kits I built back when I was a kid and King Richard Petty was still on the track. I believe the chassis is "generic" in that it's the same for all Revell stock car kits. That is actually accurate. For research material I bought a "Motorbooks" book on how they build the real deal and in fact, there are only about three chassis builders who make virtually all of the body pans and roll cages. They are very standardized and the only differences between a Chevy and a Ford and a Dodge are the engine, transmission and the shape of the body. NASCAR has rules that dictate how almost all of the rest of the car is built and which components are allowed. As for the body, not a single speck of it has any relation to what you see in the showroom except for the shape. The bodies are hand shaped and welded from sheet steel, fabricated directly onto the roll cage. The noses and tails are usually plastic moldings that are supplied by the various car makers but aren't the same as those on street models. So much for the "stock" of stock cars!
I built it almost entirely straight out of the box. The only thing that I did with plastic that Revell didn't supply was punch out a few small disks of plastic sheet that I used to replace detail that was lost due to sanding a few components to scale thickness. It's not a particularly hard kit to build. The only trouble I had was the location of the sides of the roll cage; I couldn't figure out if they fit inside or outside a couple of locating pins on the fender wells. That and the wheels. The "Goodyear" markings are decals. When I applied them they became very sticky. They would stick to my fingers whenever I touched the tires. I tried spraying on a coat of clear flat, but unfortunately I chose Testor's lacquer based "Dullcoat". That made the whole tire terribly sticky! I went to a NASCAR message board and posted a question about it and the answer was, "Yes, the decals react with the tires and remain sticky and using a solvent based over coat makes it worse..." Oh well. I just told Pete they were authentic race compound tires and that's why they were sticky! Then they didn't snap on to the axles at all well. The application of a little too much pressure resulted in re-gluing some suspension parts. They aren't even snapped on. It's a good thing it's in a clear plastic case wired to the base or they'd fall off.
I used Model Master aircraft grey for the interior. That may not be accurate for this particular car as I read that there was some question about it being red on the aforementioned NASCAR message board, but, the vast majority of NASCAR interiors are light gloss grey in order to show any fluid leaks. The white is Boyd's. I think it's the best gloss white around. The "UPS brown" is a home brew of gloss black, yellow and red. I think I ended up getting the shade right but it needs a little more red if you compare it to the numbers. Pete says the number's color is correct so I missed, but not by much. Pete says that the color is called "Pullman Brown" and was chosen way back when UPS first started because it doesn't show dirt as much as other colors. It looks pretty good at arms length. Pete didn't know it was coming; he was rather speechless. That's one of the best parts about modeling, I think! Dave DeLang
|
|
Photos and text © by Dave DeLang