|
THE
AIRCRAFT
Like
so many other aircraft of the 1950's, the
A-4 was created to deliver
nuclear weapons. It was
intended to penetrate at low altitude and pop up to deliver one of
the early nuclear weapons in the U.S. arsenal such as the Mk 12, but
fortunately it never had to carry out that mission. The A-4 also had
another similarity to other 50's aircraft (like the F-104 and HS Gnat) in that
it was a reaction against the increasing cost, complexity, and weight of
tactical aircraft being designed at the time. The A-4 eventually
went on to become an excellent conventional light attack aircraft,
gaining along the way more avionics, more weapons, and new engines. Through
all of that it never lost the superb handling that made it such a delight to
fly , and it still serves to this day in
some air forces; albeit, in a greatly more capable form. The A-4
had a long combat history in U.S. use, starting with the Lebanon crisis of
1958, and reaching its peak during the Vietnam War. Several different types of
A-4 served during that war stretching from the A-4B to the A-4F.
The A-4C variant was originally proposed with a different engine and more
sophisticated avionics, but engine delays and cost over runs resulted in a
scaling back of the program. In the end the A-4 kept the J-65
engine (the last of the U.S. new build series to do so), but added an
autopilot, low altitude bombing system, and terrain avoidance radar to
give it a limited all weather capability. It was during the Vietnam
conflict on May 1, 1967 that one VA-76 A-4 pilot achieved fame (later
duplicated by the Israelis), when he shot down a MiG-17 that had attacked
him, using Zuni air to ground rockets. The following link to an A-4 site
provides the full story: http://www.skyhawk.org/2K/join.htm
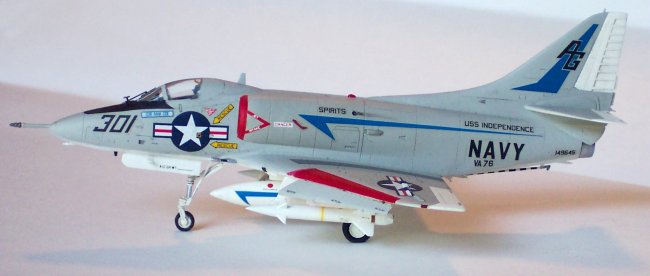
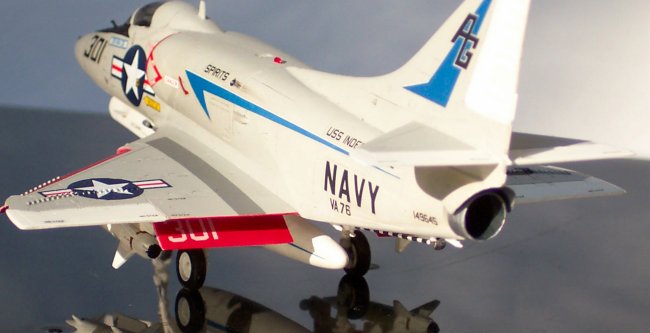
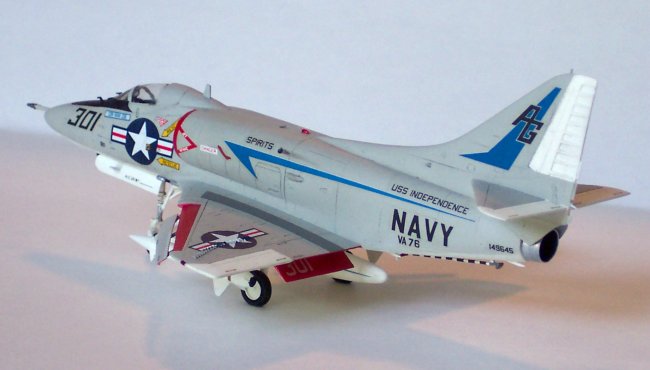
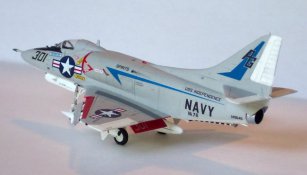
The markings on this aircraft were rather plain (see ARC's A-4 Walk
around for pictures), and later the squadron changed to much flashier
markings including a stylized MiG-17 silhouette on the fuselage sides.
These later markings are the ones that Fujimi kitted, and I used; although,
they are not for the aircraft that achieved the kill.
http://www.skyhawk.org/2K/join.htm
The markings on this aircraft were rather plain (see ARC's A-4 Walk
around for pictures), and later the squadron changed to much flashier
markings including a stylized MiG-17 silhouette on the fuselage sides.
These later markings are the ones that Fujimi kitted, and I used; although,
they are not for the aircraft that achieved the kill.
|
Click on
images below to see larger images
|
|

|
|
THE
MODEL
In 1/72 the best option, by far, for modeling an A-4 is the Fujimi series.
They have crisply molded detail, accurate shapes, and cover most, but not all, of
the variants produced. The only problems that I've seen with them
is due to the modular construction to allow for the various sub types.
This leads to some fit problems, and some minor inaccuracies. Their A-4C
"Spirits" kit is molded in white plastic and includes nice, if
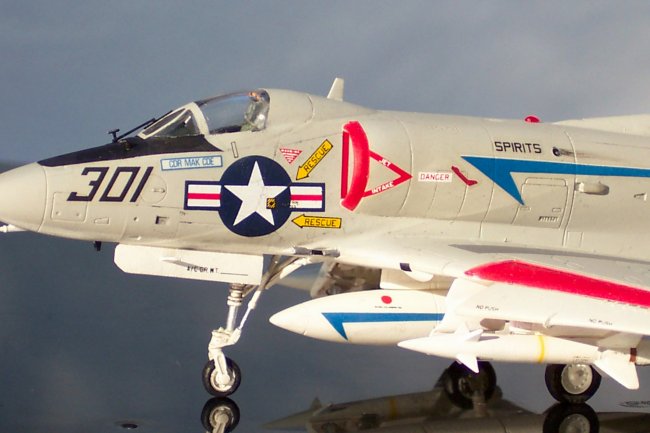
somewhat thick decals. As always I started at the cockpit and made some
modifications here; although, not too many, since it was to have a closed
canopy. I scribed the "quilted" fabric installed on the
sidewalls and used an instrument panel decal from Modeldecal sheet # 21.
The kit decal has an all black background, while the real thing (and the
Modeldecal one) has black instruments on a gray panel. I also
replaced the kit seat with the much better True details Escapac seat.
This meant some slight modifications had to be made to
the headrest. The seat and the cockpit in general, were painted
with Polly Scale Dark Gull Gray (FS#36231), gloss coated with Future then
decaled, given a wash with Tamiya # X-19 Smoke, and finally matte
coated with Polly Scale Matte finish. The nose and cockpit section
of the kit are a separate section, so this was then assembled after some lead
fishing weights were installed. While waiting for these various items to
dry I was also working on the rear fuselage. I elected not to paint the
intake trunking, since the plastic was already white, and installed the
trunking and engine compressor (painted a suitable dark metallic gray) into
the fuselage. The rear fuselage section was then assembled, and the wings
added. The wings give the option of dropped flaps, by cutting them out
and gluing them back on in the deployed position. When doing so the
landing gear fairing on the flaps needs to be beveled to allow them to sit at
the proper angle, and the "trench" from this fairing on the flap's
inner surfaces needs to be filled in (in this case with Tamiya putty).
The area under the leading edge slats requires quite a bit of sanding to hide
the seam, and one needs to be careful while doing that to avoid breaking off
the actuators. A hole had to be drilled on the fuselage port side, to
simulate the oil vent for the engine. I also replaced the kit
arresting hook (which comes molded as part of a fuselage half) with
stretched sprue. Mine was warped, and there was no way it wouldn't have
broken when cleaning up the fuselage seams. The front fuselage section
was then added with no major fit problems. The intakes then followed,
and I feel these fit better than the intakes on their A-4M kit, mainly because
they have a flatter shape. The speed brakes (in closed position),
landing gear, gear doors, pylons and centerline external tank, along with the
canopy and small bits were all added, and the kit was ready for painting after
some rescribing.
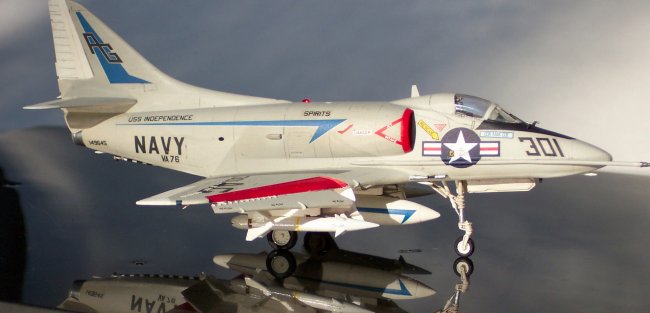
PAINTING
AND DECALING
Following
masking of the canopy with Tamiya tape Polly Scale Reefer White was applied to
the fuselage and control surfaces. This was the first time I used this
paint after seeing several people recommend it. Personally, after using
both, I still prefer Model Master Flat White enamel. The
control surfaces were masked off, and Gunze Sangyo Light Gull Gray
(FS#16440) was applied to the upper surfaces. This was followed up with
Tamiya # X-7 Red on the inner flap and slat surfaces. I did not paint the
edges of the gear doors red, as the few pictures of VA-76 aircraft I could
find in these markings, mainly the old Squadron Signal A-4 In Action
book showed them without the red edges. Future was then sprayed as a
gloss coat and left to dry for 24 hours. The decals were a mix of Super
Scale's A-4 sheet # 72-430, for the national insignia, rescue markings, and
stenciling. Spare black decals were used for the data placards on the
landing gear struts. The actual unit markings were supplied by the kit
decal sheet. I used Micro Scales Micro Sol on the the Super Scale
decals, but the kit ones required the use of stronger Solvaset. Two
oddities should be pointed out regarding the kit decals. The national
insignia on the port side of the aircraft has the top of the star misaligned;
that is intentional. There was an access panel that was evidently under
the national insignia that was removed and replaced, leaving the top of the
star out of alignment. I elected not to reproduce that, since at one
point the star was in proper configuration. The other is the lack of an
aircraft type "A-4C" on the tail, accompanying the aircraft BuNo.
I was unable to find any pictures to confirm this, so I left it as per the kit
instructions. The walkways are the kit decals, but these were sprayed
with Gunze Dark Gull Gray (FS#36321), since photos I could find showed them in
gray, not black. Once the decaling was finished another coat of Future
was applied to seal the decals. Pictures that I can find of this
squadron's aircraft show them to be relatively clean, so I used artists
charcoal brushed onto the panel lines. Since the finish was still
glossy, most of the charcoal did not stick, which was what I wanted. The
wheel wells received a wash of Tamiya Smoke and Tamiya #XF-40 Flat brown.
Polly Scale Matte coat was then applied to finish.
|
Click on
images below to see larger images
|
|

|
|
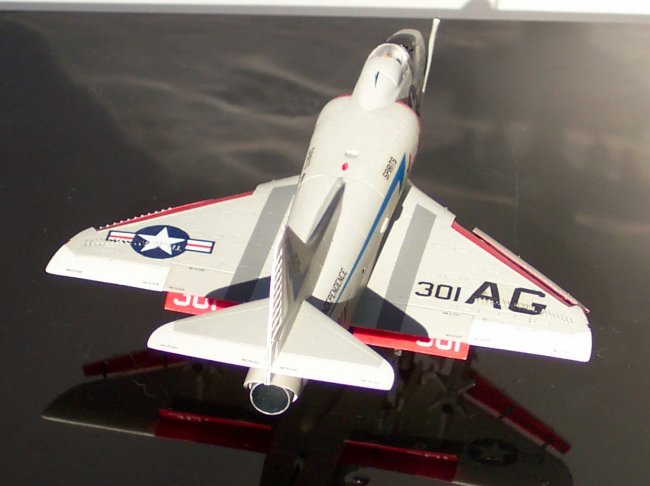
FINISHING
While working on the kit itself I had also been working on the AGM-12B
Bullpup missiles. These are provided with the kit, but I elected to use
the ones from Hasegawa's Weapons Set IV, since they are more accurate.
The molding ridges were sanded off and they were painted white then clear
coated (Future again). The appropriate brown and yellow stripes were
applied along with some stenciling and Future applied once more. The
missiles were then given a final coat of Model Master Matte Finish which
is really semi-gloss. The wheels were added at this point, with the
tires painted in Tamiya Flat Black # XF-4, then the nozzle finished in
Rub 'n Buff. The position lights were also painted, and the upper
anti-collision beacon, which had disappeared during sanding, was added from
the Czech Master Navigation Light set. The landing light on
the right, main gear door came from a Hasegawa F-111 kit. Finally the
small pitot tubes and windshield wiper were added and painted; these were all
made from plastic card and stretched sprue. The Fujimi kit is
a terrific reproduction of the A-4 with few vices in its assembly, and are, by
far, the best versions of the A-4 in 1/72 scale.
Murph
|
|